ATV assembly is easy and a great learning experience!
ATV assembly does'nt need to be a job for a mechanic. With just a little preparation you can set assemble an ATV and learn a great deal about your new quad. A word of caution before I go further. Some manufacturers will require a dealer to set up and service a product to validate warranty. Check with your dealer to be sure.
So, you have made your order and you patiently await the day for your new "toy" to arrive! Come, on admit it. The wait is just as much fun. Okay, maybe not. Anyhow, the day finally comes and you recieve your ATV. Now what? Well, there are several tools and tips that can save you alot of time and headache that you can have ready.
Prefer to watch a video? Click here to see an assembly video!
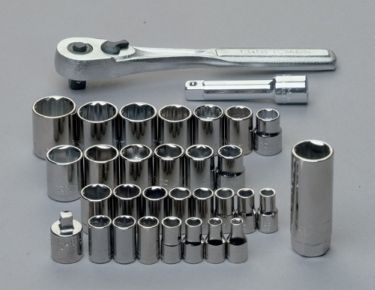
The first thing you'll need is a ratchet and socket set. That steel crate is not going to unbolt itself! You will need to remove the crate from your ATV. ATV assembly is not the cleanest task either, so a pair of gloves would be great. Keep the ratchet set close by. It will be the primary tool during the ATV assembly.
Once you have removed the crate. There will most likely be quite a bit of foam and plastic sheets to prevent scuffing of the plastic. Remove all of this.
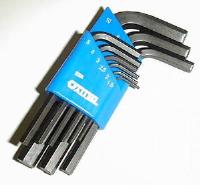
The next step in the ATV assembly process is to mount the handlebars. Look in the box that came with the ATV. There should be 4 "U" shaped mounts. Two of these go down onto the steering column, the handlebars lay inside, and the other two mounts go on the top. They are held together usually by 4 allen head bolts. So the next tool you will need is an allen wrench set.
Once the handlebars are tight and adjusted to the desired position, we can move onto the suspension. On some ATVs, the shocks will come preassembled. On others, you need to bolt on the shocks in the correct positions. An invaluable tool for this step as well as the next is a pair of jack stands.
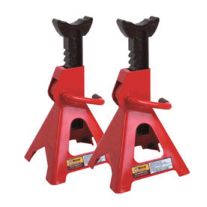
The next step in ATV assembly is to add the wheels. Have a friend help to raise the rear end of the ATV while you place a jack stand under each axle. On large ATVs, a jack may be needed. Make sure that the tread on both tires face the same direction and mount them onto the rear axle. Repeat this step with the front wheels. You may need to have a long nose pliers to bend the cotter keys after mounting the wheels.
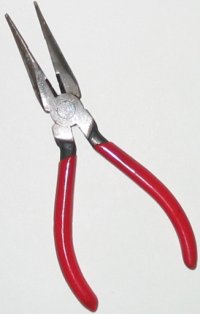
And while you've got the pliers handy, it's a wise idea to check all of the cotter keys on the ATV to make sure that they are there and bent to stay there!
Depending on your brand of ATV, that may be all there is to it. Of course there may be some plastic guards or covers that need to go on as well.
The battery will have to be filled with acid. My suggestion is to do this first. That way it will be charging while you are assembling the ATV. Just let it stand for an hour. By the time you finish assembly, it will be ready to go!
I like to add a small amount of gas and check for leaks around the fuel filter and fuel lines. Then I choke the ATV and start it for the first time. After it warms up a little, I take it off of choke, shut it down, and change the engine oil to a quality 15W40 grade oil. I do this before I ever move the ATV.
The set up time can vary depending on the size of your ATV. However it should take 2 people no longer than an hour and yo'll be ready for the trails!